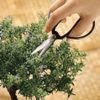
Scissors is one of bonsai tools, If you want to make bonsai with scissors, your scissors should be a very sturdy pair with as narrow a point as you can find, the same goes for your wire cutters. The wire cutters serve a dual purpose, both for wire and tree trimming. The wire needs to be copper as it has a few specific properties I will mention later, but choose several thicknesses and at least a small amount of about 1/4" wide flat copper for bands. Want to make your tree grow thicker quicker? Simple! Place a loose band of the flat copper at it's base. This causes it to grow thicker quicker! Keep an eye on it because you don't need a band mark, all you have to do is loosen it a bit when it gets tight, or remove it altogether.

Please wire the branches with differing thicknesses of copper wire, keep a close eye on them as they could scar the tree. I have found a few really fun ways to create some interesting shapes. One is to set it so that it has some sort of shelving above it, balcony rails work well, turn the tree so that the branch you want to grow is pushed by the shelve and leave it there for at least 2 weeks. Windows and walls work great for this method as well. Stringing and staking are two more of my favorite, non-wire methods. With some string (and nylons work great for no scarring) you can slowly pull branches in any direction you want. To get really dramatic results, combine this with a stake, either inside or outside of the pot. One easy way that I like to do is to tie a nylon loosely on a branch and Duct Tape it to something outside the pot, or to the pot itself!

Please let the branches grow as long as they want on the side you choose to keep them. I like to let them grow about 1-2" apart and about 6 to 7 branches. Once they have gotten long enough (at least 3-4 inches) the fun starts ;). Take your tree, and a few weeks before the final planting, use the "string and stake" method described above and on the non-branched side, bend it as far as you can with out breaking it or pulling it out of the ground. A bit of wire at the base can help stabilize the direction you want to keep it as well. When you remove the wire and or string and it does not spring back, it is ready. Remove it from the pot, knock most of the dirt off the roots then strip the bark off the non branched side of the tree. You will need a long style of pot, I have found a lot of nice styles in the ceramic serving dish sections at thrift stores. Lay it out in the pot, is it deep enough to bury half the trunk and most of the roots? If so you are ready to proceed. Next, go ahead and put dirt in the pot. Don't fill it but maybe halfway and rest your tree in it to get a feel of space. At this point you will need to trim the roots almost level to the ground. Make sure at least half the roots are still there! Now, on the stripped side of your tree, give it a scrape to open it fresh, dip your finger in root hormone powder and run that down the stripped side. Place the tree gently in the pot and gently put dirt around it until it is about half up the trunk. Use some pea gravel to hold the dirt still and gently water. This is pretty drastic so expect a bit of shock. You should see some return to health in 2-3 days. You will leave it like this until you see some new growth occur. Once that has happened you have rooting. At this point you have two options. The least damaging to the tree is to take it back up, and bend it a bit here and there to create a staggered effect. You can now bury the tree until all you see is the new tree trunks. My way? Cut it apart, put a bit of root hormone powder on each cut, and just plant them around in various spots in the pot. The reason I use one tree to do this is it gives the appearance of a natural grove, all very similar trees in one spot. They will have the same growth rate and same characteristics so you can judge future growth.
Are the leaves on you little tree just too big for you? Here is a good one. It seems like torture, and maybe it is but it works great! Twice a year, cut half the leaves off (early spring and late summer work best). I like to do it to every other leaf. The next step would be to cut every leaf left in half. A year or two of this and the leaves grow smaller. Now and then one will insist on growing, but just cut it, it will only be one or two!
Also of topiary befit, you can do many of these things to any larger tree or shrub as well. The thing to keep in mind is any large or deep wound you create should be protected with Mastic. This is easy to find at any garden supply store and will grow out as the tree or shrub develops bark. If I have decided to actually cut an entire branch off, I tend to "shave" it clean, with any sharp implement, than apply the mastic. Do this right and you won't even know that a branch was there!

Please wire the branches with differing thicknesses of copper wire, keep a close eye on them as they could scar the tree. I have found a few really fun ways to create some interesting shapes. One is to set it so that it has some sort of shelving above it, balcony rails work well, turn the tree so that the branch you want to grow is pushed by the shelve and leave it there for at least 2 weeks. Windows and walls work great for this method as well. Stringing and staking are two more of my favorite, non-wire methods. With some string (and nylons work great for no scarring) you can slowly pull branches in any direction you want. To get really dramatic results, combine this with a stake, either inside or outside of the pot. One easy way that I like to do is to tie a nylon loosely on a branch and Duct Tape it to something outside the pot, or to the pot itself!

Please let the branches grow as long as they want on the side you choose to keep them. I like to let them grow about 1-2" apart and about 6 to 7 branches. Once they have gotten long enough (at least 3-4 inches) the fun starts ;). Take your tree, and a few weeks before the final planting, use the "string and stake" method described above and on the non-branched side, bend it as far as you can with out breaking it or pulling it out of the ground. A bit of wire at the base can help stabilize the direction you want to keep it as well. When you remove the wire and or string and it does not spring back, it is ready. Remove it from the pot, knock most of the dirt off the roots then strip the bark off the non branched side of the tree. You will need a long style of pot, I have found a lot of nice styles in the ceramic serving dish sections at thrift stores. Lay it out in the pot, is it deep enough to bury half the trunk and most of the roots? If so you are ready to proceed. Next, go ahead and put dirt in the pot. Don't fill it but maybe halfway and rest your tree in it to get a feel of space. At this point you will need to trim the roots almost level to the ground. Make sure at least half the roots are still there! Now, on the stripped side of your tree, give it a scrape to open it fresh, dip your finger in root hormone powder and run that down the stripped side. Place the tree gently in the pot and gently put dirt around it until it is about half up the trunk. Use some pea gravel to hold the dirt still and gently water. This is pretty drastic so expect a bit of shock. You should see some return to health in 2-3 days. You will leave it like this until you see some new growth occur. Once that has happened you have rooting. At this point you have two options. The least damaging to the tree is to take it back up, and bend it a bit here and there to create a staggered effect. You can now bury the tree until all you see is the new tree trunks. My way? Cut it apart, put a bit of root hormone powder on each cut, and just plant them around in various spots in the pot. The reason I use one tree to do this is it gives the appearance of a natural grove, all very similar trees in one spot. They will have the same growth rate and same characteristics so you can judge future growth.
Are the leaves on you little tree just too big for you? Here is a good one. It seems like torture, and maybe it is but it works great! Twice a year, cut half the leaves off (early spring and late summer work best). I like to do it to every other leaf. The next step would be to cut every leaf left in half. A year or two of this and the leaves grow smaller. Now and then one will insist on growing, but just cut it, it will only be one or two!

Also of topiary befit, you can do many of these things to any larger tree or shrub as well. The thing to keep in mind is any large or deep wound you create should be protected with Mastic. This is easy to find at any garden supply store and will grow out as the tree or shrub develops bark. If I have decided to actually cut an entire branch off, I tend to "shave" it clean, with any sharp implement, than apply the mastic. Do this right and you won't even know that a branch was there!


